30 Nov, 2025 | | No Comments
White Balance in Photography: The Essential Guide
The post White Balance in Photography: The Essential Guide appeared first on Digital Photography School. It was authored by Darren Rowse.

White balance. It’s a term that’s thrown around a lot in the world of photography, yet it’s unfortunate how many photographers are left scratching their heads when trying to explain or understand it.
Because here’s the thing: if you want to capture a scene as the human eye perceives it, then white balance should be on your radar. Mastering white balance, both during your shoot and in post-processing, can be the key to more natural-looking photos.
Therefore, in this article, I’m going to share everything you ever wanted to know about white balance, including:
- The white balance camera settings you should use for consistently good results
- How white balance can instantly improve your shots
- How you can use white balance for gorgeous creative effects in your photos
I’m also going to explain key related terms, such as color temperature, white balance presets, and more.
And I promise you: by the time you’ve finished this article, you’ll be an absolute WB expert! Let’s get started.
What is white balance in photography?
White balance refers to the process of removing or neutralizing color casts in your images – because at its core, white balance is about ensuring the colors in your photograph appear as they do in real life.
You see, different light sources emit light with various temperatures and/or tints. Ever noticed how a photo taken under fluorescent lighting sometimes has a blueish hue? Or how shots by candlelight can seem overly warm or yellow? That’s the effect of these different light sources on your images.
Since photographers often want to produce images that look natural, white balancing involves carefully adjusting your camera settings or editing tools to counteract these color casts. It’s about taking an image like this, full of distorted, too-blue colors:

And adding warm colors until you balance out the color cast, so you get a final result like this:

You might be wondering: If lights have such strong color casts, how come I never notice them?
It’s a good question with a simple answer: human eyes are pretty good at correcting for color casts in real time, but a camera captures the subject as it looks in life. Sometimes, the subject will have neutral tones, but other times it’ll be very blue (as in the pear photo above) and sometimes very yellow (as in the pear photo below). In both the blue and the yellow cases, white balancing is necessary to create a neutral image.
Here’s a too-yellow pear photo, which requires significant cooling during the white balancing process:

Note that, during white balancing, you’re adjusting the colors along two spectrums:
- The blue-yellow spectrum, also known as the color temperature
- The green-magenta spectrum, also known as the color tint
In general, natural light only requires correction along the blue-yellow spectrum, but certain types of artificial lighting may produce a noticeable color tint, in which case you’ll need to correct for that, too.
Color temperature explained
The bulk of white balancing in photography consists of color temperature correction. You’re correcting for a cast produced by the color temperature of the light, which lies along the blue-yellow spectrum.
Think of it this way: some light sources exude a more yellowish glow, while others lean towards a bluish hue. When we encounter the former, it’s termed a “warm” color temperature. Conversely, the bluish tint signals a “cool” color temperature.
Photographers refer to different color temperatures using the Kelvin scale. Warmer color temperatures, such as those produced by a candle flame or a setting sun, have a low Kelvin value, such as 3000 K. Neutral color temperatures, such as midday sunlight, have a medium Kelvin value – around 5000 K. And cooler color temperatures, produced by clouds or shade, have a high Kelvin value of 6000 K and beyond.
Cooler light has a high Kelvin value? Warmer light has a low Kelvin value?
Yes, you read that right, and it can be confusing, especially if you’ve never encountered the color temperature scale before. But you’ll get used to it over time (and it can help to think of the color temperatures as simply the opposite of what you’d expect).
Why is white balance important?
Color casts cause a couple of problems in photography.
First, they prevent you from capturing accurate, true colors in a scene. If you want to photograph a beautiful red sunset exactly as it appears to your eye, you’ll need to neutralize any color casts; otherwise, your image won’t match the real-life conditions you experienced.
This can also be an issue if you’re doing product photography or real-estate photography, where the goal is to portray the subject as true to life as possible.
Second, color casts tend to look bad. They can mess with portrait skin tones, they can create muddy shadows and sickly highlights, and they can create unwanted moods in your photos.
As I explain later in this article, you can use a color cast for creative effect – but it’s important that you do this carefully and deliberately, rather than as a failure to properly white balance a scene. Make sense?
The two white balancing methods
You can adjust the white balance of your images in two broad ways:
- In camera, before taking a shot
- Afterward, in post-processing
Both approaches can work, but there are some important caveats to keep in mind:
In-camera white balancing
Most cameras allow you to adjust your white balance settings before ever taking a photo.
For instance, you can select a white balance preset (such as Tungsten, Flash, Cloudy, etc.), which allows your camera to roughly understand and compensate for the lighting conditions.
Some cameras also allow for a custom white balance. Here, you simply dial in a Kelvin value (remember the color temperature scale I shared above?). A high Kelvin value will balance out cooler light and a low Kelvin value will balance out warmer light.
Your camera may even be capable of white balancing off a gray card. Put the gray card in front of your camera, select the right function in the menu, take a picture, and – voila! – your camera will create an accurate color temperature profile of the scene.
But while these white balance options allow you to handle color casts in the field, they come with some drawbacks:
- Unless you’re in an enclosed environment, the light will likely change over the course of your shoot. You’ll need to periodically update your white balance preset or redo the gray card process as the sun goes behind clouds, as it sets, etc.
- White balance presets, while easy to use, are only approximate. They often won’t produce a perfect result.
- If you’re shooting action from a distance, taking a gray card reading is impossible.
That’s why some photographers prefer a different method of white balancing:
White balancing while editing
White balancing in post-processing is pretty simple:
Just set your camera to its Auto White Balance function when out shooting.
Then, when you get back home, open your photos in your editing program of choice.
Most editors offer a similar process, which involves using the white balance eyedropper to identify a neutral tone and fine-tuning via the Temperature and Tint sliders. (Below, I give a step-by-step process for white balancing photos in Lightroom.)
You can white balance each photo individually, or you can create a white balance adjustment for one (or a handful) of photos, then sync the adjustment across the entire set.
After-the-fact white balancing is nice, but like in-camera white balancing, there are a few points you need to keep in mind.
- You’ll need to set aside extra time in post-processing to do your white balancing. And while you can save time with batch processing and presets, if you’re capturing lots of images under different lighting conditions, you may prefer the relative ease of in-camera white balancing.
- Unless you take photos with a gray card in the frame, you may struggle to get a perfect white balance result with editing. In many cases, that’s fine – the color cast may be barely perceptible – but if you’re photographing products, your client may require literally perfect colors.
- For complete white balancing flexibility in editing, you must shoot in RAW. While JPEGs allow for some white balance adjustments, you’ll be limited an often-unacceptable amount – whereas RAW files let you completely set and reset the white balance.
So while post-processing and in-camera white balancing are both serviceable, you’ll ultimately need to choose the option that works best for you.
How to white balance using in-camera presets
While white balance presets aren’t the most accurate way to color correct, they’re an easy way to get started (and if you’re simply capturing photos to share on social media, they may be all you require).
Simply pull up your in-camera white balance menu. You should see several presets, such as:
- Sunny, which works for mid-morning and mid-afternoon sun
- Shade, which works for scenarios with heavy shade (e.g., portraits under a tree)
- Cloudy, which works for outdoor scenes featuring overcast lighting
- Flash, which works for scenes lit by standard off-camera speedlights and pop-up flashes
- Incandescent, which works for indoor scenes lit by standard warm bulbs
- Fluorescent, which works for indoor scenes lit by fluorescent bulbs
Then pick the preset that most closely matches the lighting conditions you’re experiencing and start taking photos! You will need to pay close attention to the light as you continue shooting; if it changes significantly, you should switch presets to reflect the new conditions.
How to white balance your photos in Lightroom
Lightroom color correction is a quick and painless process.
First, open an image in the Develop module, then find the WB section on the right-hand side:

Next, select the Eyedropper icon:

Then click on a part of your image that should look a neutral gray or white. (Don’t be afraid to click in a few different places, especially if you’re not sure what counts as “neutral.”)

If you can’t find a neutral area to sample, or you don’t like the results, you can always head over to the Temp and Tint sliders:

You probably won’t need to adjust the Tint slider much, but feel free to drag the Temp slider back and forth until you get a neutral image.

How to creatively use white balance for different effects
While it’s always important to start by color correcting your photos, you can sometimes enhance images by deliberately pushing the white balance in the wrong direction. This generally works best when applied in a post-processing program, not in camera (though you can technically do it either way).
The idea here is simple:
By applying a too-cold white balance to your photos, you can create a somber, moody effect.
And by applying a too-warm white balance to your photos, you can create a welcoming, inviting, even nostalgic effect.
I don’t recommend you push the white balance too far – at some point, your photos may look unnatural – but a bit of cool or warm color is often nice when added carefully.
Note that you can also use an “incorrect” white balance to exaggerate the conditions of the scene. Adding cool hues will give images a shady or night effect, while adding warm hues will give images a sunrise or sunset effect. Again, use this technique with care. It’s easy to go overboard and end up with garish, unpleasant results.
White balance in photography: final words
Now that you’ve finished this article, you’re ready to start adjusting the white balance in your photos so you can capture truly lifelike, authentic images.
Remember, however: don’t be confined by the idea of “correctness.” As with many elements in photography, white balance can also be a tool for artistic expression. Explore, experiment, and embrace the power of white balance to transform the mood and atmosphere of your shots.
So go out with your camera. Practice working with white balance. And make your images shine!
Now over to you:
What do you think about white balance in photography? Do you have any tips for improving your results? Share your thoughts in the comments below!
White balance FAQ
White balance ensures that the colors in your images are accurate and natural. Incorrect white balance can lead to color casts, detracting from the image’s overall quality and authenticity.
White balance compensates for the color casts produced by either color temperature or color tint shifts. On the other hand, color temperature specifically refers to where the light falls on the blue-yellow spectrum.
The simplest indication is when the colors in your image appear natural and true to the scene!
Yes, you can. Many editing software options allow for white balance adjustments, giving photographers the flexibility to refine the white balance even after a shot has been taken.
The post White Balance in Photography: The Essential Guide appeared first on Digital Photography School. It was authored by Darren Rowse.
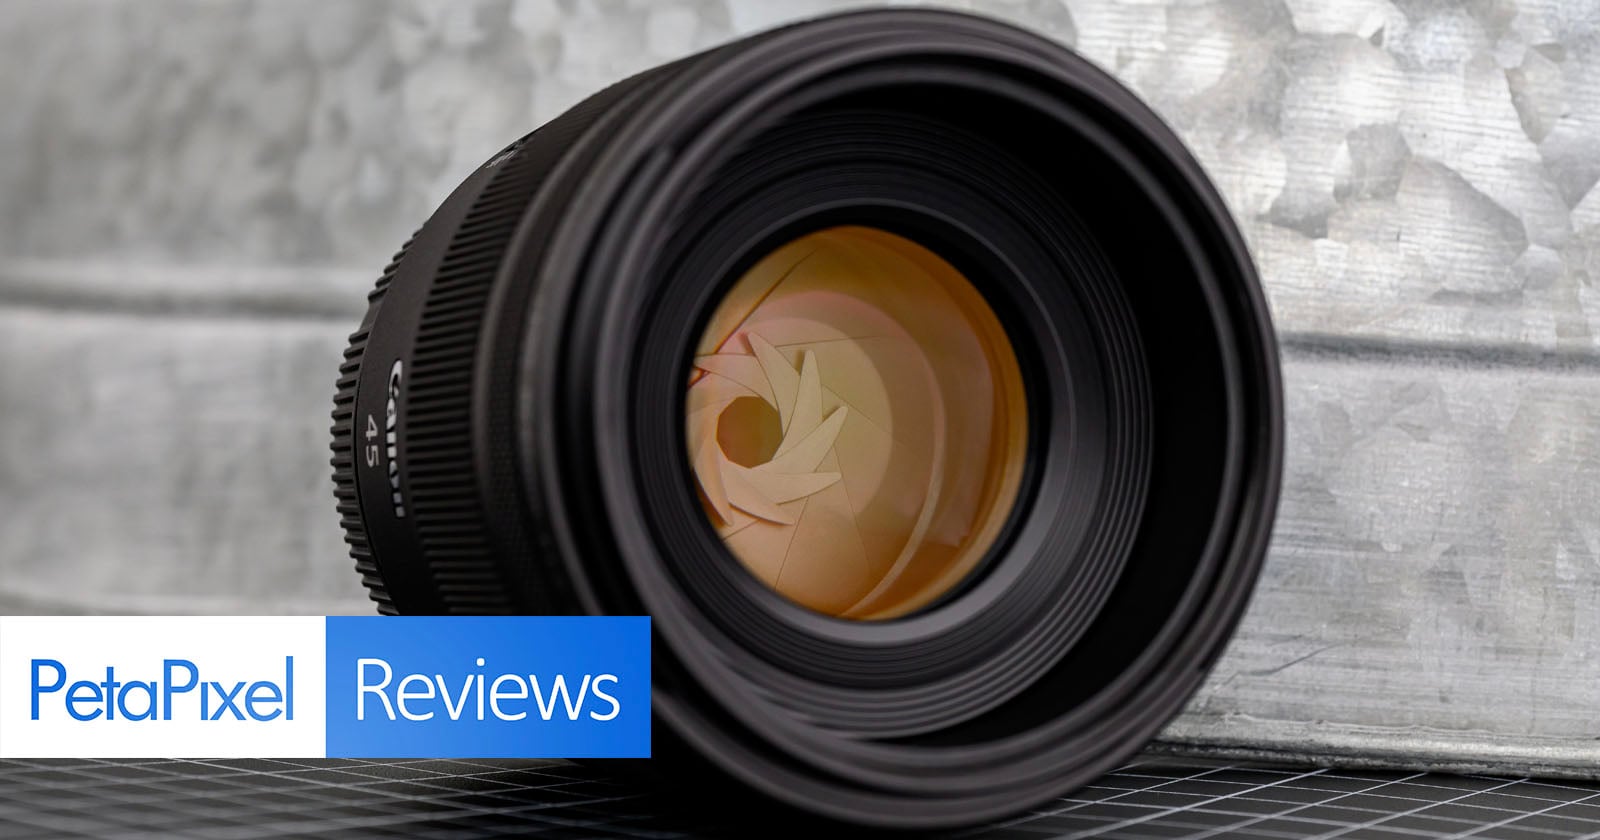
In a photo industry of ever-increasing prices, it’s refreshing to see optics that supply exceptional value for the dollar. The new Canon RF 45mm f/1.2 STM made the entire industry double-take upon seeing an f/1.2 optic for only $479. Surely, there must be a catch, so I took the handy little 45mm to a local Christmas market to explore the myriad lights using an extremely shallow depth of field lens.
![]()
BenQ has expanded its Designer series with the PD2770U, a 27-inch 4K UHD color management monitor aimed at small studios, independent creators, and post-production teams by combining professional-level color performance with integrated hardware calibration, without the need for external devices.
26 Nov, 2025 | | No Comments
Multiply Blend Mode: A Comprehensive Guide
The post Multiply Blend Mode: A Comprehensive Guide appeared first on Digital Photography School. It was authored by Ana Mireles.

Multiply is one of Photoshop’s most popular blend modes. If you’ve ever followed the steps in a Photoshop editing tutorial, you’ve probably used it yourself, and if you’ve ever watched a Photoshop expert apply edits to their work, you’ve probably seen it in action.
But why is Multiply so common? What makes it such a popular choice among Photoshop artists and photographers? It’s because the Multiply blend mode is very versatile; it can be used to create all sorts of interesting effects.
In this article, I offer a comprehensive overview of Photoshop’s Multiply blend mode. I discuss what it is and how you can use it, plus I offer a step-by-step tutorial so you can see it in action.
Let’s dive right in.
What is Multiply blend mode?

As you probably know, Photoshop allows you to work with layers. And on each layer, you can put different elements: text, an image, an adjustment, and so on.
Now, Photoshop’s blending modes allow you to change how a layer interacts with the layers underneath. The blending modes are divided into categories (you’ll see a line dividing each category in the blending mode menu).
One of these blending mode categories is Darken, which includes the mode featured in this article, Multiply. As the name of the category suggests, by applying a Darken blend mode, you darken the overall file.
In the case of Multiply, the image is darkened by multiplying (hence the name) the color values from one layer by the layers underneath.
Don’t worry about the math, though. Photoshop takes care of that! What you need to know is that multiplying any layer by a black layer will create a black image, and that multiplying any layer by a white layer will cause the white layer to disappear. However, if you multiply a midtone layer by another midtone layer, you’ll end up with a combination of the two layers – but as darker versions of themselves.
When should you use Multiply blend mode?
The answer to this question is very straightforward: You should use Multiply blend mode when you want to darken your image.
What does this mean in practical terms? Here are a few common cases in which you might apply Multiply:
- When you want to recover faded color from vintage photographs
- When you’re fixing an overexposed image
- When you want to include a shadow on a cutout
- When you want to color under a traced drawing so that the lines remain black
Of course, there are plenty of other uses for Multiply, so don’t feel restricted by my list; these are just some scenarios to keep in mind.
How to use Multiply blend mode
The Multiply blend mode is very easy to use! Here’s how it works:
First, open any image in Photoshop. It’ll become the base layer (by default, it’ll appear as a locked layer called “Background”).

Next, add a second layer. The layer type doesn’t matter; just do what works for your file. It can be a text layer, an adjustment layer, etc. I’ve used a raster layer that contains this image:

By default, the layer will completely cover the original layer beneath it.
Next, go to the Layers panel. (If you can’t see this, you’ll need to open it. To do so, simply choose Window>Layers or press the F7 key on your keyboard.)
Toward the top of the Layers panel, you’ll find the blending options. You should see the blend mode on the left and the opacity on the right. By default, any layer will be set to Normal blend mode at 100% – but to use the Multiply blend mode, just click on the arrow next to the word “Normal” to open the drop-down menu:

Find “Multiply” on the list. (Remember, you’ll always find it in the Darken section of the menu.) If you’re using Photoshop CC, you’ll see a preview as you hover over the Multiply option – but in Photoshop CS6, you’ll need to actually click to apply the mode before you can see the effect.
Now click on the arrow next to the percentage value to open the Opacity slider. Simply drag the handle of the slider to adjust the layer opacity. You can also input a value directly:

Note: If these options aren’t enabled, it might be because your layer is blocked. Make sure your layer is selected and visible!
Do keep in mind that you need a layer underneath for the Multiply blend mode to have an effect. If you have a single layer and you change the blend mode from Normal to Multiply, you won’t see any difference. (The same is true if the layer underneath is a pure white background!)
Multiply blend mode: a step-by-step example
As I mentioned above, one of the common uses of Multiply blend mode is to fix an overexposed photograph. That’s what I’ll do for my example image:

I’ve already opened my image on a new layer, so I’ll start by adding a Curves adjustment layer. You can do this by clicking on the “Create a new fill or adjustment layer” button at the bottom of the Layers panel:

Without making any adjustments in the Curves properties panel, I’ll simply change the blending mode to Multiply, and the image will immediately darken:

You can already see the difference, but if you want, you can also make some adjustments to the Curves layer:

After adjusting the curve, it’s clear that the darker areas have become too dark. So I’ll lower the opacity a bit:

In my opinion, the brightest areas are too bright, so I’ll duplicate the Curves layer. (Duplicating a layer preserves its blending mode settings; in this case, my duplicate Curves layer is still in Multiply mode at 90% opacity.)
But I don’t want to darken the entire shot – just the too-bright areas – so I’ll fill the layer mask with black so that the second multiply effect isn’t visible. Then, using a white brush, I’ll paint over the brightest areas to reveal the darkening effect.
Here’s a before and after comparison:

Multiply blend mode tips
Here are a few quick tips so you can fine-tune the Multiply effect according to your needs:
1. Try using Blend If

The Blend If feature allows you to adjust how layers blend according to their content.
For example, let’s say that the shadows of my image turn out too dark due to the Multiply mode. I can use Blend If to tell Photoshop to blend my top layer only with the brightest parts of the base layer. That way, I can darken the highlights without losing details in the shadows.
You can find the Blend If feature inside the Layer Style dialog box. To reach this, go to the Layers panel. Then double-click on the layer that you want to adjust. (Make sure you click in the blank space next to the layer’s name. Otherwise, you’ll open a different menu or feature!)
The Layer Style box will pop up, and you should then find the Blend If section. Here, you’ll see two gradients; the top one refers to the layer on which you’re working, and the bottom one refers to the layer underneath.
Simply click and drag the handles along these gradients to modify the blending effect. Note that each handle has a line in the middle, which allows you to split the handle and create a smoother transition. To do this, simply hold the Alt/Opt key and drag along the handle!
2. Use Multiply with brushes
The Multiply blend mode is not only available for layers; it can also be used with brushes. All you need to do is select the Brush tool, then head to the Options bar at the top of the screen.
Then open the Blend drop-down menu (next to the word “Mode”). Scroll down and click on Multiply:

Then go ahead and paint with your brush! Whatever you paint will interact with the layer underneath by following the Multiply blend mode rules.
Multiply blend mode: final words
Now that you’ve finished this article, you know all about using the Multiply blend mode, so go ahead and try it out! See what you can create, and have some fun experimenting with different effects.
Note that, while I talked about using the Multiply blend mode in Photoshop, you’ll also find this effect in other editing programs that work with layers. And in most cases, it’ll behave in the exact same way!
How do you plan to use Multiply? Do you have any tips or tricks that I didn’t discuss in the article? Share your thoughts in the comments below!
The post Multiply Blend Mode: A Comprehensive Guide appeared first on Digital Photography School. It was authored by Ana Mireles.
25 Nov, 2025 | | No Comments
15 Best Photo-Editing Apps in 2024 (+ Buying Guide)
The post 15 Best Photo-Editing Apps in 2024 (+ Buying Guide) appeared first on Digital Photography School. It was authored by Ana Mireles.

Photo editing is one of the most effective ways to give your photos a refined, professional look, but desktop editors can be frustratingly inconvenient for photographers (and expensive, too!).
Fortunately, smartphones and tablets now offer access to an impressive range of outstanding editing apps. Many of these tools are powerful, easy for beginners to grasp, and free to download. The best photo-editing apps are wildly convenient, too; you can use them to dramatically improve your shots while riding the bus, flying on a plane, or lounging in front of the couch.
The sheer number of options can be overwhelming, however – and that’s where we come in. Below, introduce you to our 15 favorite editing apps, including options for beginners, advanced users, and everyone in between. We also break down the process of choosing the perfect app for your photo-editing needs.
Ready to enhance your photos with a top-notch editing app? Let’s dive right in!
The best photo-editing apps for general editing
In this section, you’ll discover the best photo-editing apps for general adjustments. With the apps on this list, you can adjust exposure, enhance colors, crop, sharpen, and more.
1. Snapseed

Snapseed is one of the most popular photo-editing apps on the market – and for good reason. It’s very intuitive and easy to use, which makes it perfect for beginners. At the same time, Snapseed offers a lot of control for more skilled users thanks to features such as selective editing, curves, perspective correction, and much more.
You don’t need to pay any fees for using Snapseed, nor are there in-app upgrades; it’s completely free. So if you’re after a beginner-friendly photo editor that can do pretty much anything, Snapseed is a great choice.
2. Lightroom

- Our award: Best paid photo-editing app
- Cost: Free limited version; paid version requires an Adobe subscription ($9.99)
- Availability: iOS and Android
Most photographers have heard of Adobe Lightroom, one of the most popular editing programs in the world. But Adobe also offers Lightroom Mobile, which is a mostly full-featured mobile version of the powerful desktop editor – and as you might expect, it packs quite a punch.
You don’t need to pay to download the app, and the limited free version does allow you to do most basic editing tasks, so if you’re just looking for a basic editor, you may never want – or need – to upgrade.
For more folks hoping to really dive into photo editing, however, we do recommend upgrading to a paid plan. There are several options, all of which offer access to the Lightroom Mobile app, one or more Adobe desktop apps – such as Lightroom or Photoshop – and cloud storage so you can seamlessly edit on several devices.
The paid plan offers a wide variety of additional features, including a healing brush, selective adjustments, geometry tools, batch editing, RAW editing, and perspective corrections. (Note: If you want to use Lightroom Mobile to speed up your workflow, check out this article.)
3. Photoshop Express

Adobe Photoshop is the industry standard for photo editing. Its mobile version is divided into three smaller and specialized apps; the basic editor is Photoshop Express.
Photoshop Express offers one-touch solutions such as an auto-fix option and filters. It also allows you to edit and retouch with total control. And it’s packed with many fun features such as stickers and collages.
You can crop to most platforms’ formats and share directly from the app. While you don’t need an Adobe subscription to use Photoshop Express, you will need a free account.
4. Pixlr

Pixlr is a well-rounded editing app, offering all the post-processing essentials plus tons of presets and features to unleash your creativity.
There’s no need to create an account and you can download Pixlr for free, though you’ll be offered in-app purchases for overlays and stickers.
Pixlr also offers two great browser versions that you can use for free – or you can get a subscription for full access to both browser versions and other useful assets.
Best photo-editing apps for fun and filters
In this section, I’ll share the best photo-editing apps for filters and effects.
(In most cases, these apps also include a camera and some basic adjustment tools.)
5. VSCO

- Our Award: Best filter app
- Cost: Free limited version; $19.99/year for the full version
- Availability: iOS and Android
VSCO works as a general photo editor, but it belongs in the fun and filter category thanks to its artsy, social-media-focused features.
To use VSCO, you will need to create a (free) account. After that, you can continue to use VSCO for free, but most of the filters are sold separately.
Alternatively, you can grab a yearly subscription for $19.99 that includes 200 filters (and you have a 7-day trial to make sure it’s worth it).
Your creations can then be shared with the community, which is like- and comments-free. In other words, the VSCO community is more about the quality of the work. You can also share VSCO creations directly from the app to other social networks such as Instagram or Snapchat.
6. Prisma Photo Editor

- Our Award: Best artistic editing app
- Cost: Free limited version or free 3-day trial. Full version is $29.99/year.
- Availability: iOS and Android
Prisma is designed for art lovers. It’s more than just filters; Prisma uses artificial intelligence to turn your photos into artworks inspired by the greatest artists in history. And unlike other apps, Prisma adds new filters every day.
General editing is also possible (as it is with most filter apps). Though I do miss the rotation tool to correct the horizon if needed.
7. PicsArt Photo Editor

- Our Award: Best all-around editing app
- Cost: 7-day free trial, then $34.99/year.
- Availability: iOS and Android
PicsArt Photo Editor is one of the most versatile editing apps on the market. You have a powerful in-app camera, plus tools and presets to no end. You can do anything with PicsArt, from professional applications like time-lapse photography to fun stickers and drawings.
PicsArt Photo Editor also has social media integration, as well as thematic contests that will spark your creativity.
8. A Color Story

A Color Story is the perfect app to manage your Instagram account. You can do some basic editing and apply filters to your images and videos.
New filter collections based on current trends are added often, although most do need to be purchased separately.
You can even plan your Instagram feed with the Grid feature. In fact, you can use this just to see how the feed looks after each picture you add, or you can connect it to your Instagram account for scheduling posts. That’s why A Color Story is great for maintaining a unified Instagram feed – whether you are a photographer, influencer, or community manager.
9. Afterlight Photo Editor

Afterlight boasts 59 filters, 66 textures, and 77 frames for you to transform your images in a single click. Some of these tools are offered for a small fee, but there is also a wide variety of free, high-quality effects to choose from.
Afterlight can also handle basic editing tasks; the app has 15 tools to make most of the adjustments you’ll need.
The Crop tool is also quite versatile; it allows you to straighten, flip, and crop freehand and to many standard ratios.
10. Photo Lab Picture Editor

- Our Award: Best editing effects app
- Cost: 3-day free trial, then $9.99/year or $4.99/month.
- Availability: iOS and Android
Photo Lab is full of filters and effects; you can have fun or do some professional-looking work. You can even turn your photos into cartoons, and you can swap faces and make collages.
Photo Lab is an app designed to give free rein to your creativity. It’s also a social app with a big community of followers that’ll help you stay inspired.
Best apps for specialized editing
If you’re looking for the best photo-editing apps with dedicated features, this is the list for you:
11. Foodie

Although it has all the standard photo-editing tools, Foodie is designed primarily for food photography.
You can use Foodie’s in-app camera to take pictures (and you’ll get a live view of your selected filter). There are plenty of food filter series, including Fresh, BBQ, Yum, and more.
Once you’ve chosen a filter, you can compose your image using the smart grid. For flat lays, you’ll get a yellow band across the edges of the screen when the camera is perfectly level.
Foodie is only missing one key editing feature, but it’s a big one: a crop tool. You’ll either need to compose well from the beginning or have another photo editor on hand to deal with any cropping.
12. SKRWT

If you like photographing architecture, real estate, or urban scenes, then you’re going to love SKRWT.
It’s a dedicated distortion-correction app, plus it has a powerful auto-cropping feature to ensure you get the best results.
And it corrects lens distortion regardless of whether the image was taken with an interchangeable lens camera, a GoPro, or your smartphone.
13. TouchRetouch

Removing unwanted objects from a photo is something we all have to deal with, no matter the genre of photography.
With TouchRetouch, you can use brush and lasso tools to select an object for removal. And if you’re removing a line (e.g., telephone wires in the background), you just need to tap; it will automatically be selected and removed.
TouchRetouch also has a clone tool, plus a feature called Quick Fix to remove blemishes. Many apps offer some kind of healing brush, but as a specialized app, TouchRetouch will get you the best results.
14. Motionleap

- Our Award: Best cinemagraph app
- Cost: Free limited version, or one of three paid choices: $3.50/month, $18/year, or a one-time purchase of $55.
- Availability: iOS and Android
Have you seen pictures where everything is motionless – except for the water running or the coffee steam coming out of a cup? They’re called cinemagraphs, and Motionleap lets you create that effect with just a few taps and swipes.
You can also add filters, do some basic adjustments, and apply overlays. Keep in mind that the free version won’t let you export your projects and you won’t have all the tools available, so it’s worth considering a paid subscription.
15. Canva

If you use your photography for marketing purposes, then Canva is the app for you. It offers enough graphic design templates to fit your every need.
From creating an eye-catching Facebook post to designing an entire menu, Canva is intuitive and easy to use.
Many templates are free, though others must be purchased separately. Canva also has a browser version so you can access your projects on your computer, too.
How to pick the perfect app for editing photos

Editing apps can vary a lot in their tools and features, so before you go downloading or purchasing an editor, make sure that it suits your needs. When choosing an app for post-processing, there are five key factors we recommend you consider:
Ease of use and interface
Photography should be fun, right? That goes for editing, too. It’s crucial that the app you choose has a user-friendly and intuitive interface. If you’re a beginner, this is especially important. There are many simple and enjoyable apps out there, but others can be complicated and convoluted.
Therefore, if you’re not tech-savvy or don’t have experience with photo editors, we really recommend you pick a simple app that offers a basic design. Some come with helpful tutorial sections or walkthroughs; these are great for beginners as they’ll help you navigate the app and use the tools effectively.
If you’re an experienced photo editor, a confusing interface might not be such a hindrance, so you may want to focus less on the app interface and more on its advanced features. But remember: Every app is unique. It’s often worth your time to test out different ones.
Fortunately, most of the apps in this list are free. And even the ones that aren’t free do tend to offer trials or demo versions. So go ahead and get your hands on a few. Take them for a spin. See how comfortable they feel before you make a commitment.
Editing features
Every photo editor is different; each comes with its unique set of features, and it’s important to find one that can do what you want it to.
Are you a hobbyist or a beginner? Then you might be looking for an app that provides basic editing features, such as cropping, rotating, adjusting brightness, contrast, and saturation. Don’t forget filters, either, which can be great fun to experiment with (and can dramatically increase your editing speed).
On the flip side, maybe you’re more of an enthusiast or a pro. In that case, you might want more advanced editing features. You’ll want to look for things like layering, text addition, object removal, and masking.
Also, if you’re looking for an easy-to-use app that’ll speed up your workflow, consider an editing app with AI tools. These apps are designed to automate the editing process and can be a lifesaver if you’re dealing with a lot of photos.
One more thing: If your main goal is to accomplish one form of precision editing, consider a specialist editing app. Several of the apps on our list focus on specific types of edits, such as perspective correction or object removal – and while they can only make one adjustment, they do an excellent job.
Key accessories
The core purpose of an editing app is, well, editing. But you shouldn’t forget about the extras. These are the features that go beyond editing but can be useful for photographers and photo editors.
Some editing apps, for instance, come with built-in cameras. You can use these to shoot and edit all in one place.
And then there’s image organization. It’s not the most exciting part of photography, but it’s important. Some apps let you organize your image library with tools such as folders, ratings, and keywords.
Cloud-storage integration can also be a game-changer, especially if you like to edit on multiple devices. This feature ensures that you can do your main editing on your desktop, then switch to your phone or tablet for editing on the go, then to your laptop for editing on the job, and so on.
And last but not least, let’s discuss exporting and sharing. Some apps let you export in certain handy file formats and share directly to social media platforms, which can be a massive time-saver.
So when you’re choosing your editing app, remember to consider these additional features. They might not be essential, but they just make your life a lot easier.
Compatibility and performance
Most of the best apps for photo editing are available for both iOS and Android devices, but a few are tailored for one type of device. It’s critical to pick an app that’s a match for your smartphone or tablet.
Before you get too excited about a specific app, take a good look at the versions available. And even if the app does have Android and iPhone versions available, keep in mind the features can differ across platforms. So if you’re checking out reviews, be sure they’re for the version you’re planning to download.
Lastly, let’s talk about performance. Some apps can be quite demanding, and whether your smartphone or tablet can run it effectively depends on a variety of factors. Checking out the system requirements beforehand will save you from any unexpected crashes and frustration.
Price
Photo-editing apps range from absolutely free to relatively expensive, and their pricing models vary, too. Some can be purchased with a one-time payment. Others require a subscription.
Generally, more expensive apps come with a wider range of features. But don’t think pricier is always better. Some of the apps listed in this article offer top-notch features and cost nothing at all.
Before making a big purchase, ask yourself if you’re really going to use those advanced features. Maybe a free or less expensive app will do just fine. And don’t forget to check for free trials. It’s always a good idea to test out a paid app before committing to it.
The best photo-editing apps: final words
In the end, the ideal photo-editing app should be a perfect fit for you. It should feel comfortable to use and have everything you need to achieve your vision. Above all, it should take your photos to the next level!
So when picking the best app to edit photos, don’t rush. Explore different apps. Take advantage of those free trials. Experiment with various tools. And if you can’t decide, remember that you don’t need to pick just one; you can use two apps, three apps, or more to improve your editing workflow.
Now over to you:
Do you like any other photo-editing apps? Are there apps that should be added to this list? Share your thoughts in the comments below!
The best image-editing apps FAQ
The best paid editing apps do sometimes offer more features than the best free editing apps, but there are excellent free choices such as Snapseed and Photoshop Express.
That depends on your needs. In our experience, it is useful to have different apps for different tasks.
If you don’t like editing on your phone, you need to use an app that allows you to easily transfer pictures between your phone and your computer. You can use Lightroom for this (with an Adobe subscription). Another choice is to use a cloud service such as Dropbox.
We’re big fans of Snapseed and Lightroom Mobile. That said, there isn’t one app that tops all the others; it’s about which one is best for you. That will depend on your phone, your budget, and your editing needs – plus your personal preference.
The post 15 Best Photo-Editing Apps in 2024 (+ Buying Guide) appeared first on Digital Photography School. It was authored by Ana Mireles.
24 Nov, 2025 | | No Comments
Introducing Godox iT32 iFlash Camera Flash & X5 TTL Wireless Flash Trigger
The post Introducing Godox iT32 iFlash Camera Flash & X5 TTL Wireless Flash Trigger appeared first on Digital Photography School. It was authored by Sime.
New from Godox, the iFlash camera flash is an interestingly modular on AND off camera flash, building on their iFLash range, this is a good option for those looking to use their flash on and off their cameras.
Why should I use my flash OFF my camera?
iFlash Camera Flash iT32 & X5 C/N/S/F/O – One System, Built for All
Meet the iT32 iFlash Camera Flash & X5 TTL Wireless Flash Trigger — a modular lighting system built for ultimate versatility and efficiency. When paired with different X5 versions, one iT32 flash body seamlessly adapts to Canon, Nikon, Sony, Fujifilm, and OM System cameras, offering full TTL and HSS support across brands. The X5 functions as both a hotshoe and wireless trigger, enabling instant transitions between on-camera use, off-camera freedom, and complex multi-light setups. Compact yet powerful, the iT32 & X5 combine magnetic modularity, cross-brand compatibility, and Godox 2.4GHz wireless integration—empowering photographers to shape light effortlessly, anytime and anywhere.

One System, Built for All
The iT32 & X5 offer a universal solution for photographers working across different camera systems. Its interchangeable magnetic X5 hotshoe allows instant switching between brands by simply changing the X5 version. This flexible design helps photographers focus more on creativity and less on equipment compatibility.
Dual Identity: Hotshoe & Trigger in One
X5 serves both as a hotshoe mount and a wireless transmitter, enabling smooth transitions between on-camera and off-camera use. When attached to iT32, it functions as the hotshoe for on-camera shooting; once detached, it automatically switches to trigger mode, wirelessly controlling iT32 or other Godox Wireless X System flashes.

Effortless Multi-Light Sync
Equipped with a built-in 2.4GHz receiver in the iT32 and a 2.4GHz sender in the X5,
the system ensures instant wireless communication without manual pairing. When used together, iT32 and X5 act as a master unit to trigger multiple Godox flashes simultaneously. When separated, the X5 can still control the iT32 and other flashes within the Godox 2.4GHz wireless X system, making multi-light setups simple, fast, and reliable.
Intelligent Recognition and Real-Time Display
The iT32 automatically identifies the attached X5 version, displaying key information such as model type, battery level, and charging status on its screen. This smart detection ensures photographers always stay aware of system status, minimizing errors and keeping shooting sessions smooth and controlled.
Magnetic Mounting, Fast and Secure
The magnetic interface between iT32 and X5 ensures a stable, one-click connection that’s firm yet quick to detach. Compared with traditional locking mechanisms, it greatly speeds up setup while maintaining reliability, allowing photographers to switch modes fluidly and capture every moment with ease.
Refined Design, Built for Practical Use
Intuitive Touchscreen Control
Rotatable Flash Head
Built-in Reflector and Diffuser
USB-C Charging
Professional Performance, Seamless Compatibility
Advanced Flash Functions
Godox 2.4GHz Wireless Ecosystem
Magnetic Accessories for Creative Expansion
LED Modeling Light
Technical Data
| Model | iT32+X5S | iT32+X5C/N/O/F |
| Global Shutter Sync Shooting | Provided | Unprovided |
| Radio Wireless Global Shutter Sync | Provided | Unprovided |
| Guide Number (1/1 step) | Approx. GN18 (ISO 100, in meters) | |
| Flash Duration (t0.1) | 1/1000s?1/30000s | |
| Exposure Control | ||
| Exposure Control System | TTL auto flash and manual flash | |
| Flash Exposure Compensation | ±3 steps with 1/3 increment each step | |
| Sync Mode | High-speed sync (up to 1/8000 seconds, or 1/80000 seconds with Sony cameras equipped with global shutter), first-curtain sync, and second-curtain sync | |
| Multi Flash | Provided (up to 100 times, 100Hz) | |
| Wireless Flash (Radio 2.4G Transmission) | ||
| Wireless Function | Sender, Receiver | |
| Sender Groups | M, A, B, C?iT32+X5S/N/F/O??A, B, C, D?iT32+X5C? | |
| Receiver Groups | A, B, C, D | |
| Transmission Range (approx) | Max. 80m (Max. 20m in separated triggering) | |
| Channels | 32: 1-32 | |
| ID | OFF/1-99 | |
| Power Supply | ||
| Lithium Battery | iT32: 7.4V/900mAh; X5: 3.8V/100mAh | |
| Recycle Time (1/1 step) | Approx. 1.5s | |
| Number of Flashes (1/1 step) | Approx. 510 | |
| Power Saving | Provide standby and auto off functions | |
| Sync Triggering Mode | Hot shoe, 2.5mm sync cord | |
| Dimension and Net Weight | ||
| Dimension | iT32: 56 * 39 * 101mm; X5: 1.26 * 1.26 * 1.06* | |
| Net Weight | iT32: 169g; X5: 23g | |
The post Introducing Godox iT32 iFlash Camera Flash & X5 TTL Wireless Flash Trigger appeared first on Digital Photography School. It was authored by Sime.

A museum director has been charged over a poster featuring a composite photograph of Russian President Vladimir Putin and Adolf Hitler merged into one face.
28 Jul, 2025 | Admin | No Comments
People Are Using a Video Game Photo Mode to Bypass the UK’s Online Safety Act

The UK recently introduced the Online Safety Act, which contains new requirements for social media platforms to protect users, particularly minors, from illegal or harmful content. As part of the regulation, users must now verify their age to access platforms that may contain adult content, including services like Discord and Reddit.
28 Jul, 2025 | Admin | No Comments
Sirui IronStar Anamorphic Lenses Promise Cinematic Quality or Under $1,000

Sirui, makers of excellent photographic lenses, unveiled the IronStar series of anamorphic cinema lenses for full-frame cameras. The trio of lenses all feature fast T1.9 apertures and 1.5x squeeze ratios, enabling the capture of CinemaScope-style widescreen ratios (2.39:1 and 2.65:1).
28 Jul, 2025 | Admin | No Comments
Sony RX1R III Review: Was This Worth Waiting Nearly 10 Years For?
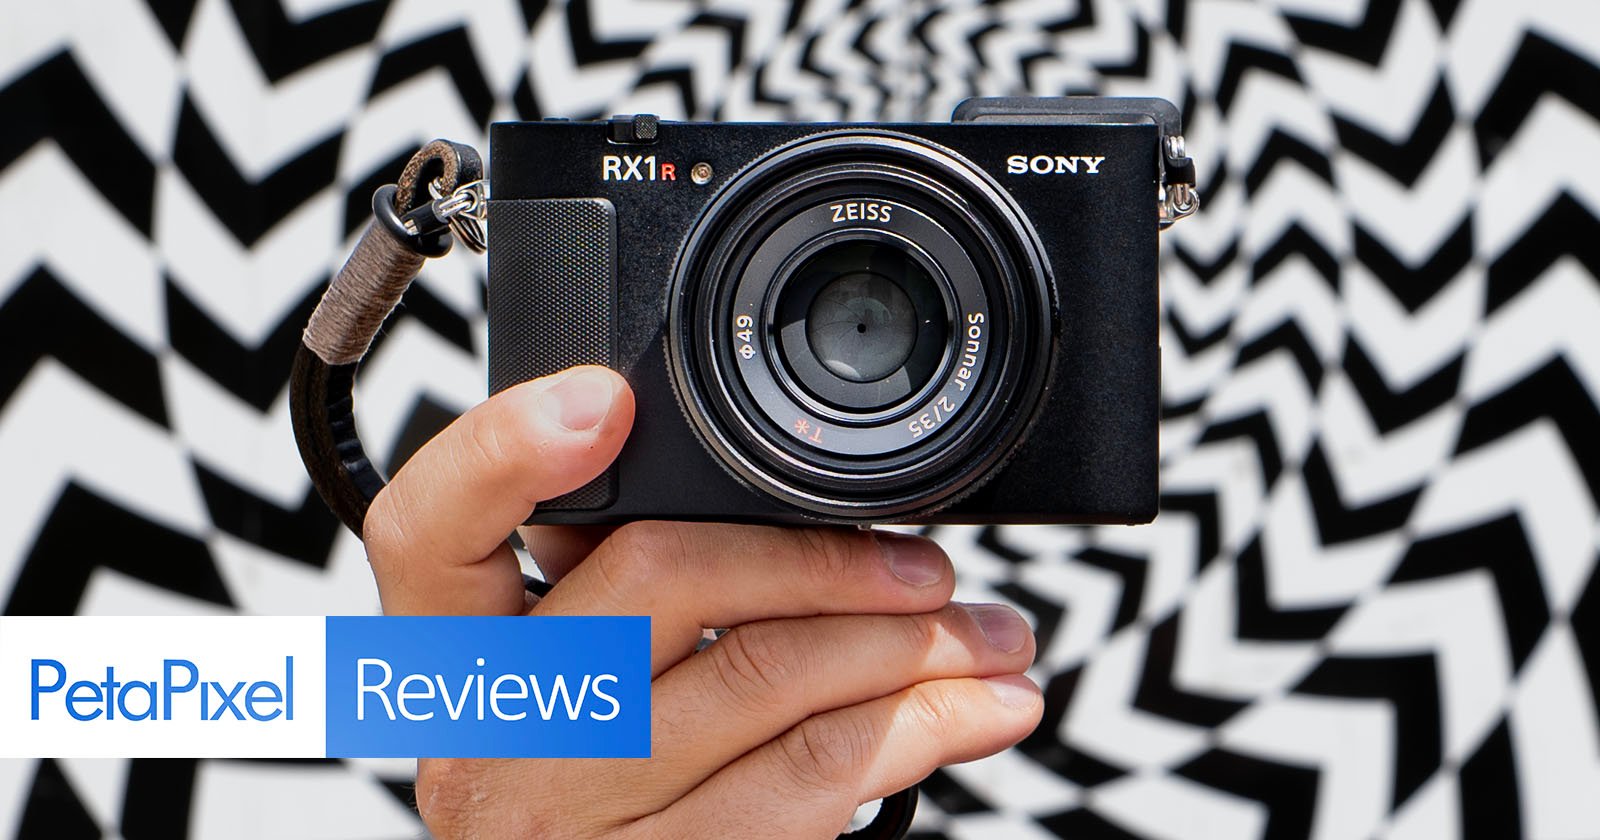
The Sony RX1R II was such a unique product for its time, offering high resolution mated to a stunning Zeiss lens, all in a compact size. However, it was always a premium product that demanded an exorbitant price. The RX1R II debuted at around $3,300, and let’s keep in mind that was nine years ago.